

Have you ever been bothered by shadows of people or products appearing in your photos? You can brighten up images or remove unwanted parts using your smartphone's built-in features or photo editing apps. This article introduces how to remove shadows on Android and iPhone, along with six free photo editing tools and tips for preventing shadows during shooting.
Part 1. Three Ways to Remove Shadows from Photos on Android
Some Android smartphones come with features that automatically remove shadows from photos, depending on the model. Let's first look at methods available on Galaxy, Google Photos, and AQUOS devices.
Method 1. Remove Photo Shadows Using Galaxy's Built-in Features
On certain Samsung Galaxy models (such as select Galaxy S, Z, and A series), you can use the AI editing feature in the standard "Gallery" app to automatically remove shadows from your photos. This feature also handles removing reflections from glass and other surfaces.
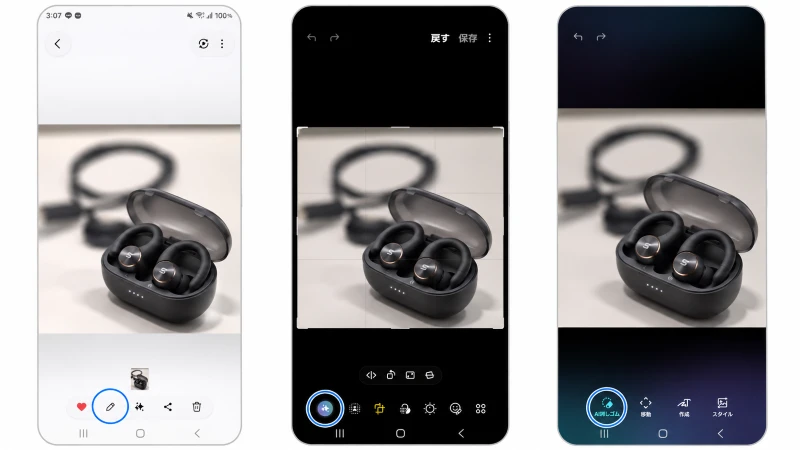
- Step 1.Open the "Gallery" app on your Galaxy device and select the photo from which you want to remove shadows.
- Step 2.Tap the edit icon at the bottom of the screen and locate the shadow removal feature in the editing menu.
- Step 3.Select "Shadows & Reflections" or the corresponding AI editing feature.
- Step 4.Tap "Shadows" to automatically detect and remove shadows within the photo.
- Step 5.Review the result and save your edits.
*Available features and their locations may vary depending on the device model and One UI version. If you cannot find the shadow removal feature, check if your device supports the relevant AI editing capabilities.
Method 2. Remove Shadows Using Magic Eraser in Google Photos
Google Photos' "Magic Eraser" is an editing tool that lets you select and remove unwanted objects from your photos. While it doesn't have a dedicated function to automatically identify shadows, you can manually brush over or select shadowed areas to remove them based on the surrounding image content.
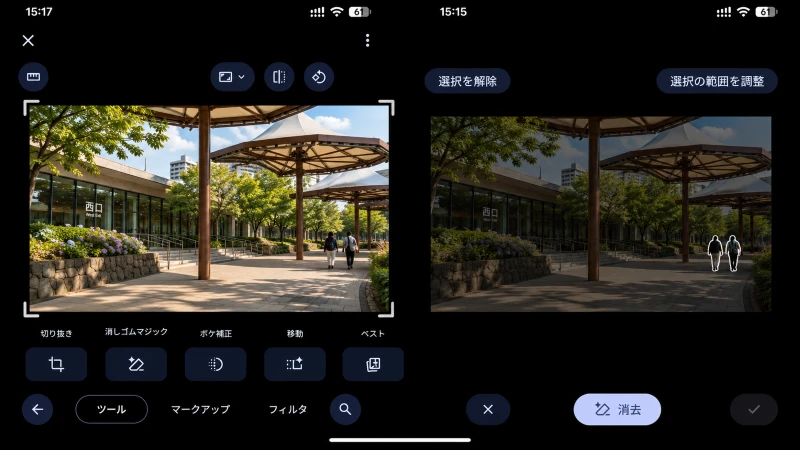
- Step 1.Open "Google Photos" on your Android phone and select the photo you wish to edit.
- Step 2.Tap "Edit" and open "Magic Eraser" from the editing tools.
- Step 3.Tap on the shadow you want to remove, or swipe your finger across it to make a selection.
- Step 4.Confirm the selected area and execute the deletion command as prompted.
- Step 5.Check the final result, tap "Done," and save the edited photo.
*In addition to compatible Google Pixel models, this feature is also available on select Android devices that support the relevant Google Photos features and plans. Usage conditions vary depending on the device and plan.
Method 3. Remove Shadows from Photos Using AQUOS AI Features
Select AQUOS models (such as certain R series and sense series devices) feature an AI camera function that automatically removes shadows when photographing food or documents. Simply take the photo as usual without worrying about shadows, and the AI will cleanly erase shadows cast by your phone or hands from the saved image. Additionally, it includes a feature that corrects documents shot at an angle to appear as if viewed straight on.
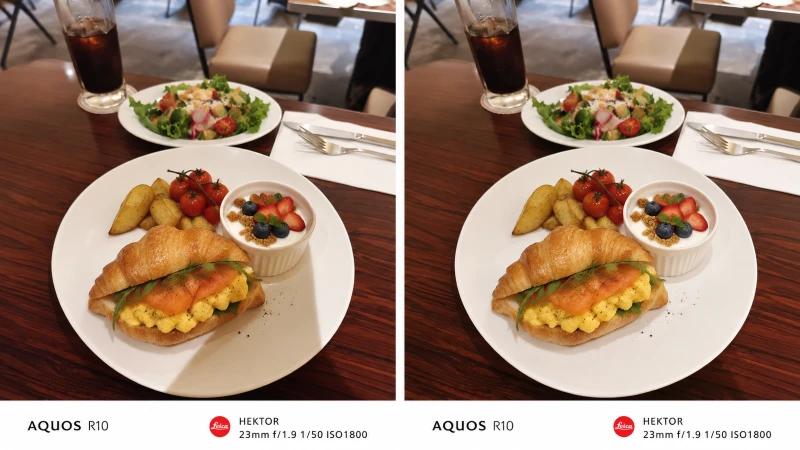
- Step 1.Launch the camera on your compatible AQUOS smartphone.
- Step 2.Point the camera at the subject from which you want to remove shadows, such as food or documents.
- Step 3.Take the photo using the compatible shooting mode. The AI recognizes shadows and automatically corrects the affected areas.
- Step 4.Open the captured photo and check if the shadows have been reduced.
Part 2. Two Ways to Remove Shadows from Photos on iPhone
On iPhone, you can use the standard "Photos" app to brighten and correct shadows, or use the "Clean Up" feature on compatible models to remove unwanted shadows. Choose the method that best suits the shadow area and the condition of your photo.
Method 1. Brighten and Correct Shadows Using the iPhone Photos App
For photos with faint shadows, you can brighten dark areas using the adjustment tools in the iPhone "Photos" app. While this doesn't completely erase shadows, adjusting brightness and shadows can make them less noticeable.
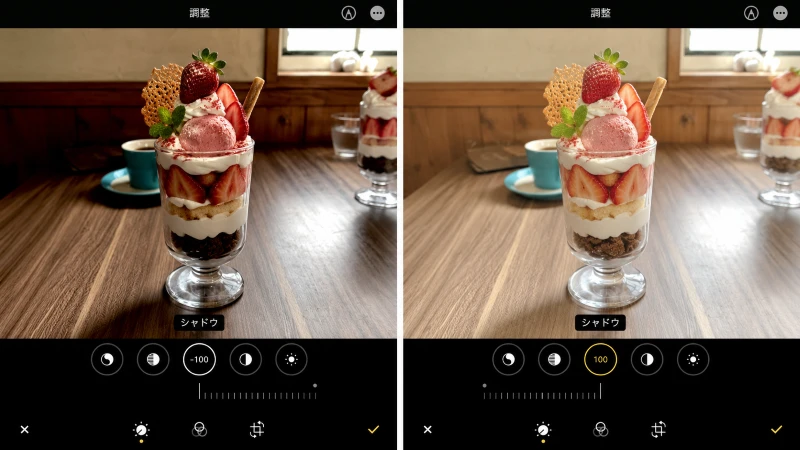
- Step 1.Open the "Photos" app on your iPhone and select the photo you wish to edit.
- Step 2.Tap "Edit" and select "Adjustments."
- Step 3.Select "Shadows" from the adjustment options.
- Step 4.Slide the control to the right to brighten the shadowed areas.
- Step 5.Adjust "Exposure" and "Brilliance" as needed, then tap "Done."
Method 2. Remove Shadows from Photos with Clean Up
All models in the iPhone 16 series, as well as the iPhone 15 Pro and iPhone 15 Pro Max, allow you to remove unwanted objects from photos using the "Clean Up" feature in the Photos app. This feature is available on devices supporting Apple Intelligence and can be used to eliminate unwanted elements such as shadows.
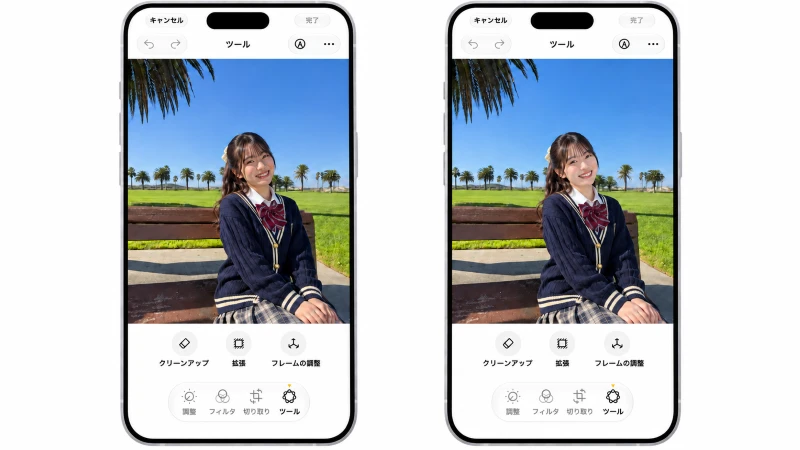
- Step 1.Open the photo from which you want to remove shadows in the "Photos" app.
- Step 2.Tap "Edit" and select "Clean Up."
- Step 3.Trace over the shadow you wish to remove with your finger, or tap to select it.
- Step 4.Review the selection and add or adjust areas as needed.
- Step 5.Tap "Done" to save your edits.
Part 3. Top 6 Free Apps and Tools for Removing Shadows from Photos
If you cannot remove shadows using your smartphone's built-in features, or if you desire a more natural finish, consider using photo editing apps or AI tools. Here, we introduce six options, ranging from prompt-based editing tools and brush-selection apps to those allowing localized brightness adjustments.
| Tool | Supported OS | Pros | Cons | Shadow Removal Accuracy |
|---|---|---|---|---|
| Movmix AI | iOS, Android, Web (PC & Mobile) | Allows flexible editing via prompts, features a simple interface, and offers free credits | Limited number of free credit uses | High |
| Snapseed | iOS, Android | Free and user-friendly, allowing for precise adjustments to fine details using brushes and spot removal tools. | Correcting large shadowed areas or complex backgrounds can be time-consuming. | Medium |
| BeautyPlus | iOS, Android, Web | The AI Remover makes it easy to delete unwanted shadows, offering a beginner-friendly interface. | Shadows overlapping complex backgrounds or subjects may appear unnatural in some cases. | High |
| Photoshop | Windows, macOS, iOS, Android, Web | Generative Fill allows for the removal of large shadowed areas, with detailed background adjustment capabilities. | Requires a learning curve, and some features are paid. | Very High |
| Magic Eraser | Web, iOS, Android | Select shadows to remove with a brush and edit easily directly in your browser. | Limitations may apply to free usage and high-resolution exports. | High |
| Relumi | iOS & Android | AI automatically corrects photo shadows, making it easy to use without detailed settings. | Since it focuses on automatic correction, it can be difficult to precisely specify shadow placement and final appearance. | Medium to High |
Movmix AI | Easily Edit Photo Shadows with Just a Prompt
Movmix AI is an AI image editing tool that allows you to naturally edit shadows and other elements simply by uploading a photo and providing text instructions. With its simple interface, there is no need for manual tasks like copying clean areas and stamping them over repeatedly, making it easy for beginners to edit. Additionally, you can earn free credits by logging in and completing daily tasks.

1. Open Movmix AI's "Image to Image" feature and upload the photo from which you want to remove shadows.
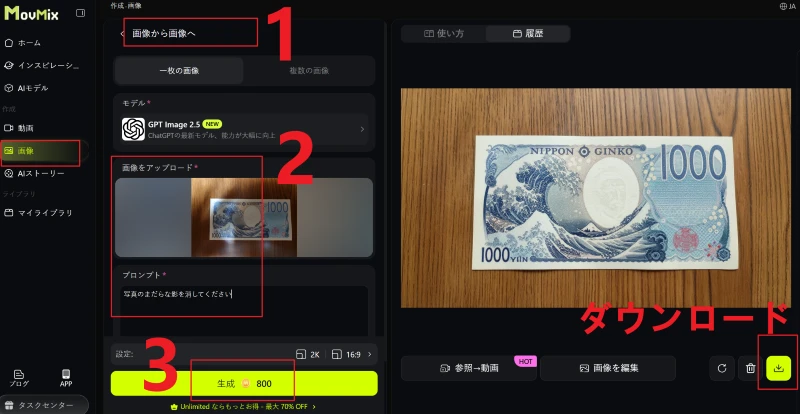
2. Enter your desired editing instructions, such as "Naturally remove shadows cast on the floor while preserving the texture of the subject and background."
3. Select the resolution and aspect ratio, generate the image, check the result, and save it. You can adjust the instructions and regenerate as needed.
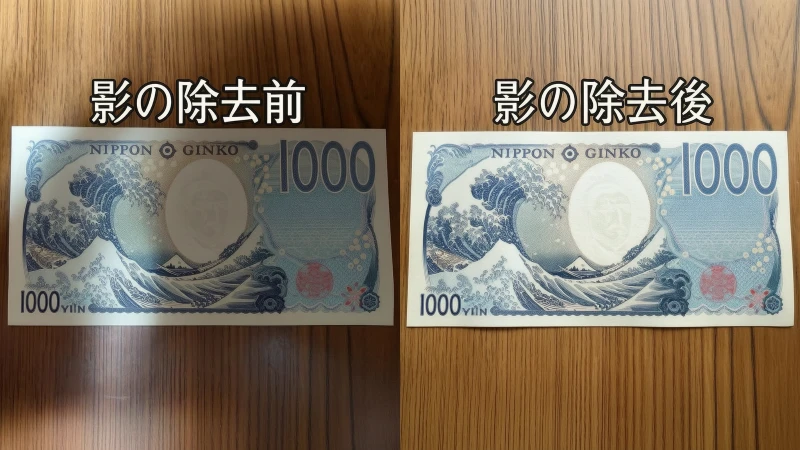
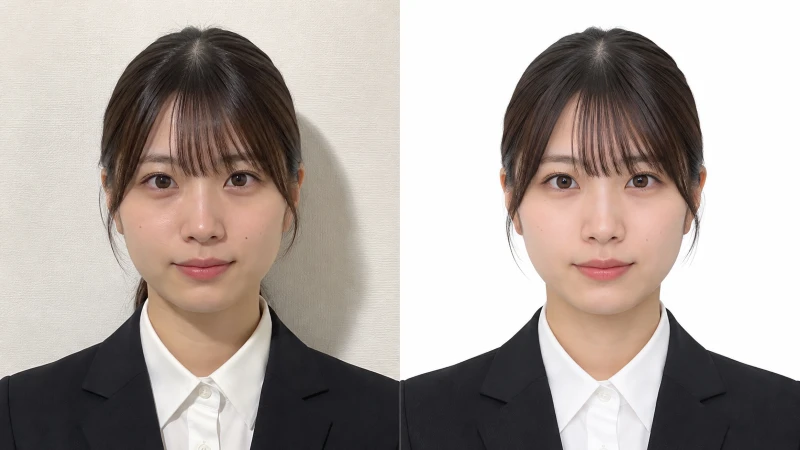
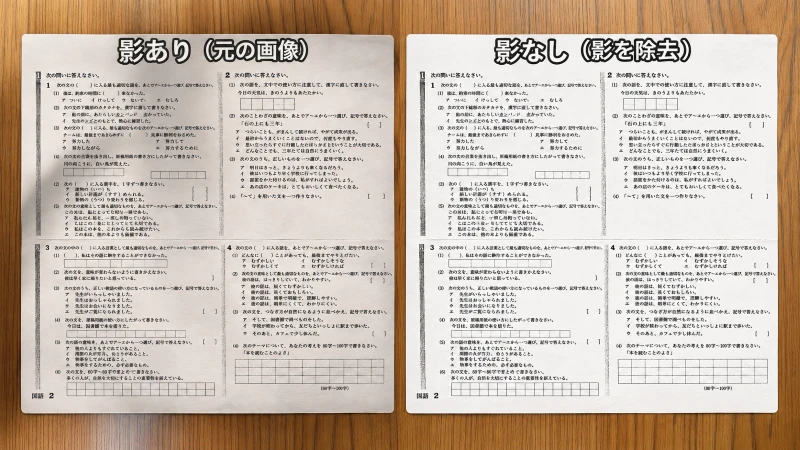
Comparison of Before and After Shadow Removal Using Movmix AI Image Generation Tool:
- 1. Remove Shadows from ID Photos
- 2. Remove Shadows from Landscapes
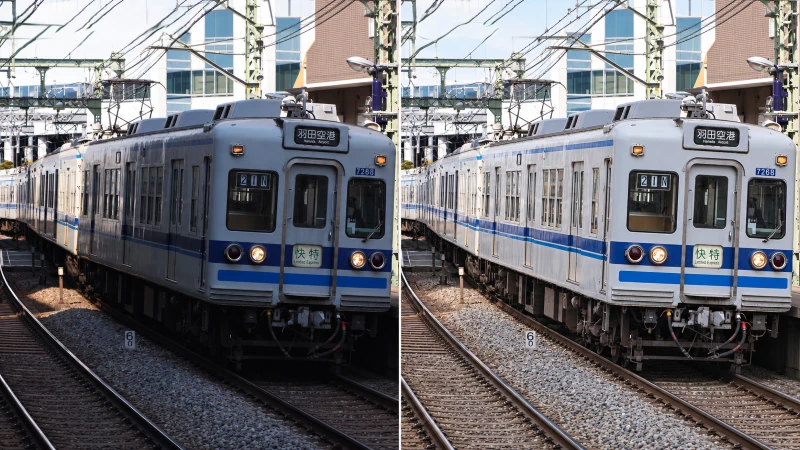
- 3. Remove Shadows from Faces

- 4. Removing Shadows from Photos of Printed Documents Taken with a Smartphone (Without Text Distortion)
Snapseed | Reduce and Correct Shadows with Brush and Healing Tools
Snapseed is a photo editing app provided by Google. It allows you to adjust brightness or exposure for specific parts of a photo using the "Brush" tool, and correct small unwanted elements by tapping or swiping with the "Healing" tool. This is convenient for brightening faint shadows or partially removing small shadows.

1. Open Snapseed and load the photo you want to edit by tapping "+".
2. Select "Brush" from "Tools," and adjust "Exposure" or "Brightness."
3. Swipe your finger over the shadowed areas to reduce the brightness difference with the surroundings.
4. For small shadows or unwanted objects, select "Healing" from "Tools," then tap or swipe over the target area to correct it.
5. Check the final result and save the image via "Export."
BeautyPlus | Remove Unwanted Shadows from Photos with AI Remover
BeautyPlus is a photo editing app designed for retouching portraits and product photos. With the "AI Remover," you can simply brush over the shadows you want to remove, and the AI will fill in the surrounding area to eliminate unwanted parts. It can also be used to remove small objects or other unwanted items from your photos, not just shadows.

1. Open BeautyPlus and select the photo from which you want to remove shadows via "Start Editing."
2. Select "Remover" on the editing screen.
3. Tap "AI Remover" and swipe your finger over the shadow areas you want to remove.
4. Confirm the selected area and tap "Start" to run the AI processing.
5. Check that the shadows have been removed naturally, then tap "Save."
Photoshop | Remove Unwanted Shadows with Generative Fill
Photoshop is an image editing software that handles everything from fine photo retouching to professional-grade image editing. By using "Generative Fill," you can leverage AI to seamlessly blend selected shadow areas with the surrounding image. It is ideal for detailed corrections where you want to check the final result, such as removing shadows from faces or shadows cast in the background of product photos.
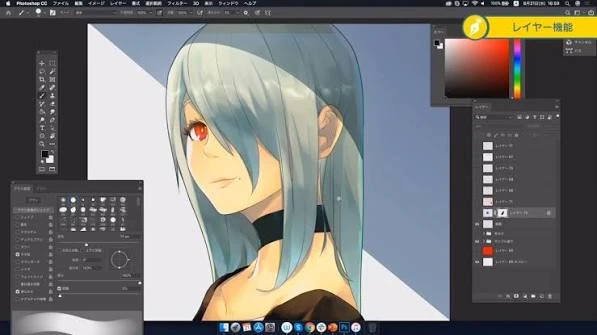
1. Open the photo with unwanted shadows in Photoshop.
2. Use a selection tool, such as the Selection Brush, to specify the area of the shadow you want to remove.
3. Select "Generative Fill" from the Contextual Task Bar.
4. Leave the prompt field blank and click "Generate" to review the AI-completed results.
5. Choose the most natural-looking option from the multiple candidates, then export and save the image.
Magic Eraser | Remove Photo Shadows via Browser
Magic Eraser is an AI-powered image editing tool accessible via web browsers and mobile apps. Simply upload your photo, paint over the shadows you wish to remove with the brush, and hit "Erase." The AI will adjust the brightness while reconstructing the texture of skin, walls, or ground beneath the shadows. It is convenient for selectively removing unwanted elements, such as shadows cast by smartphones or in product photography.

1. Open Magic Eraser in your browser and upload the photo containing shadows.
2. Use the brush to trace over the shadow areas you want to remove.
3. Ensure the selection includes the faded edges of the shadows, then click "Erase."
4. Review the processed image, re-edit any remaining shadow spots if necessary, and save the file.
Relumi | Automatically Reduce Shadows in Photos with AI Shadow Correction
Relumi is an AI-powered photo editing app designed for enhancing and correcting image quality. By using the "AI Shadow Correction" feature, the app analyzes your uploaded photos and automatically reduces shadows. It’s ideal for users who want to avoid the hassle of manually selecting shadow areas with a brush or prefer quick and easy corrections on their smartphones.

1. Launch Relumi and upload the photo from which you want to remove shadows by tapping the "+" button.
2. Select "AI Shadow Correction" from the toolbar.
3. Once the AI correction is complete, check the shadow intensity and the overall look of the photo.
4. If everything looks good, tap "Save" in the top-right corner to save your photo.
Part 4. How to Take Photos Without Unwanted Shadows
While you can fix shadows in photos using apps later on, dark or widespread shadows can be difficult to remove cleanly. It’s often easier to prevent shadows during shooting than to correct them afterward with software. Here, we’ll introduce tips for taking photos without shadows, using examples such as Mercari product shots, food photography, documents, and portraits.
1. How to Prevent Shadows When Photographing Products, Food, or Documents
- Move Your Smartphone Away and Zoom In 2–3x: Lift your smartphone as high as possible and zoom in about 2–3 times before shooting. The key is to keep your hands and the phone itself away from the subject.
- Use Soft Natural Light by a Window: Avoid direct sunlight and instead use natural light coming through a window or the soft light of an overcast day. If the sunlight is too strong, consider shooting in the shade.
- Place a Diffuser in Front of the Light Source: Set up a dedicated diffuser or soft cloth in front of strong lights or flashes to scatter and soften the light.
- Brighten Shadows with a White Board: Place a white sheet of paper or Styrofoam board (available at dollar stores) on the side opposite the light source to reflect light onto the shadowed areas.
- Position Lighting at a 45-Degree Angle: Place the light source diagonally in front of or to the side of the subject, and shoot from a position where your body doesn’t block the light.
- Keep the Subject Slightly Away from the Background: Position products or people slightly away from walls or backdrops to prevent shadows from falling directly onto the background.
Additionally, when shooting from directly above, make use of your smartphone’s level assistance features. On Android, turn on the camera grid function. On iPhone, enable both "Grid" and "Level," then align the crosshair in the center of the screen to easily confirm a level shooting position.
2. How to Prevent Facial Shadows When Taking ID Photos or Portraits
- Combine Key Light and Fill Light: Position the key light diagonally above and in front of the face, and apply a weaker fill light from the opposite side. This helps soften shadows under the nose, chin, and bangs.
- Bounce Flash Off Ceilings or Walls: Instead of pointing the camera-mounted flash directly at the subject, use bounce photography by reflecting the light off ceilings or walls.
- Shoot Through the Center of a Ring Light: Place the camera in the center of the ring light to ensure even illumination across the face.
Conclusion
Shadows in photos can be reduced or removed using built-in features on devices like Galaxy and iPhone, editing apps such as Movmix AI and Snapseed, or AI tools. Choose the method that best suits your photo: adjust brightness or use spot removal for small shadows, and employ AI removers or generative fill for larger areas. Additionally, it is important to manage light sources and camera positioning during shooting to cast soft light on the subject. By combining effective shooting techniques with editing tools, you can achieve natural-looking photos with minimal shadows.