Ever generated an amazing-looking image, turned it into a video, and wondered why the result didn't quite match what you imagined?
Maybe you wanted a dramatic solar eclipse, but the glowing corona was already there from the first second. Or perhaps you imagined a massive portal opening above a city, only to watch the effect blend awkwardly into the buildings.
It's tempting to blame the Video Prompt.
But sometimes, the problem starts before the video even begins.
Your first frame for AI video is more than a beautiful image. It's the starting point for everything that happens next.
You can create your initial image using Movmix AI Text to Image, then use it as the visual foundation for video generation.
In this guide, we'll explore three cinematic examples that show how better first-frame preparation can improve your results:
- Epic Fantasy: A solar eclipse above an ancient castle.
- Sci-Fi Blockbuster: A giant portal opening over a modern city.
- Ancient Fantasy: A sleeping stone guardian awakening in a misty valley.
Each example includes a Reference Image Prompt, a Video Prompt, and practical advice for creating more controlled cinematic effects.
The goal isn't to make every element move at once. It's to make the right things happen at the right moment.
1. Why Your First Frame Matters
In an image-to-video workflow, the first frame establishes the visual starting point of your video.
It defines what the subject looks like, where objects are positioned, how the scene is composed, and what the environment looks like before motion begins.
Imagine you're creating a video of a giant sci-fi portal gradually opening.
If your reference image already shows a fully expanded portal, asking the model to generate its opening sequence creates a conflict between the starting image and the desired action.
The same applies to a sleeping stone guardian. If its eyes and every rune are already glowing in the first frame, there's little room left to show the awakening process.
A good first frame should capture the moment just before the main action or visual effect develops—not simply display the finished result.
When preparing cinematic AI videos, focus on three essential principles:
| Principle | What to Consider | Why It Matters |
|---|---|---|
| Timing | How far has the effect progressed in the first frame? | Establishes a clear starting point |
| Composition | Is there enough room for the upcoming effect? | Helps avoid unwanted overlap and cropping |
| Motion Control | Which elements should move, and which should remain unchanged? | Reduces unnecessary visual changes |
Let's put these principles into practice.
2. Example 1: Create an Epic Solar Eclipse Scene
First-frame technique: Start before the main effect happens.
Imagine an epic fantasy movie scene.
A mysterious heroine stands on the balcony of an ancient castle, looking toward distant mountains. Above her, a dramatic solar eclipse slowly forms. Clouds begin to roll across the sky, while the wind lifts her hair and dark blue cloak.
The finished shot feels enormous, but the actual animation is relatively simple.
The protagonist doesn't need to walk, fight, or perform complicated movements.
Instead, we focus on the eclipse, moving clouds, hair, and cloak.
| Reference Image Prompt | Output |
|---|---|
| 16:9 horizontal epic fantasy film scene. A beautiful black-haired female protagonist stands on the high balcony of an ancient stone castle, wearing a long dark blue cloak. Her body faces the distant sky, with her side profile clearly visible. Vast mountains stretch into the distance beneath thick clouds. A large bright sun dominates the center of the sky, with the edge of the moon just beginning to overlap it. The eclipse has not fully formed, and soft natural golden sunlight remains visible. The protagonist stands steadily, with her hair and cloak resting naturally. Clear stone balcony architecture, generous sky space for the upcoming eclipse effect, epic scale, realistic cinematic photography, detailed natural lighting, fixed wide composition, no text, no logo, no watermark. | 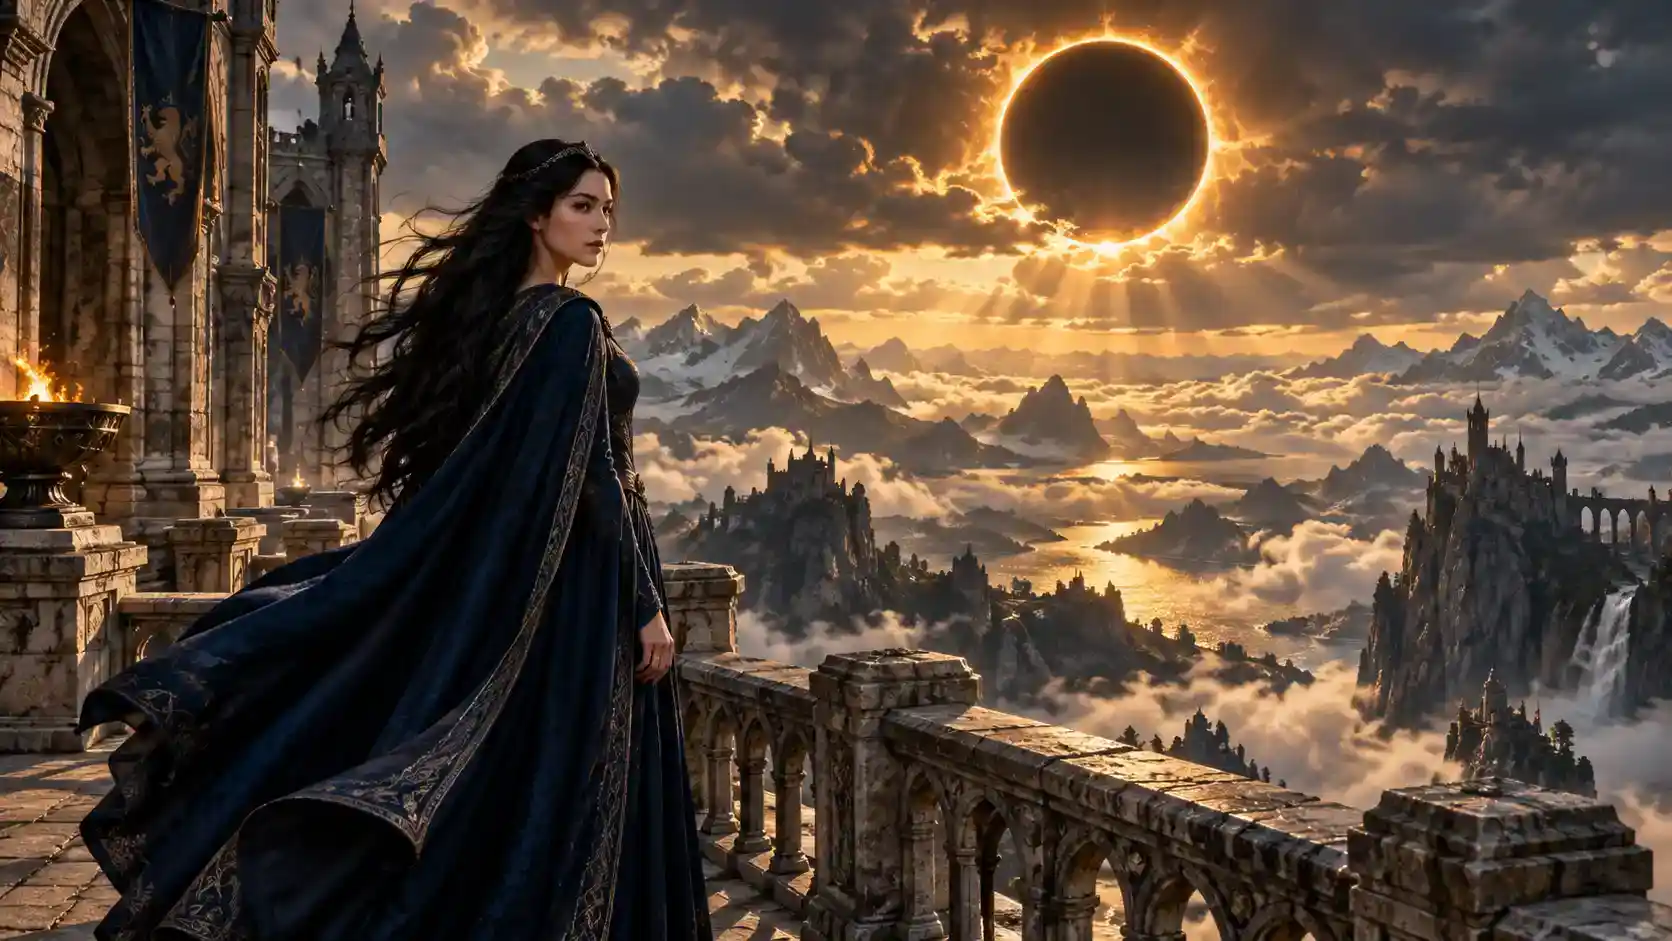 |
Video Prompt:
6-second epic fantasy cinematic shot. The moon gradually moves across the sun, forming a dramatic solar eclipse through a stylized cinematic time-lapse effect. A brilliant golden corona slowly appears around the sun while thick clouds roll gently across the distant mountains. The protagonist remains standing on the ancient castle balcony as her black hair and dark blue cloak move naturally in the strengthening wind. The camera slowly pushes forward from a rear three-quarter angle, emphasizing the enormous scale of the eclipse. Preserve the protagonist's facial features, clothing, castle architecture, and distant mountains. Do not introduce additional characters or objects.
What it does: Transforms a calm fantasy landscape into a dramatic eclipse sequence through evolving light, atmospheric movement, and subtle character animation.
Best for: Fantasy Films, AI Movie Trailers, Cinematic Storytelling.
Watch out: Don't show the complete eclipse in the first frame. The point is to let the viewer experience its formation. Similarly, avoid starting with the cloak already flying dramatically in the wind.
Key takeaway: Your first frame should capture the scene before the major visual effect reaches its final state.
3. Example 2: Open a Giant Sci-Fi Portal Above a City
First-frame technique: Leave enough space for large-scale visual effects.
Let's move from fantasy to science fiction.
This time, there's no main character. Our subject is an ordinary modern city that slowly becomes the setting for a spectacular sci-fi event.
A tiny blue energy arc appears in the sky, gradually expanding into a gigantic circular portal.
The important part of this example is composition.
If buildings occupy nearly the entire image, there may not be enough visual space for the portal to expand without interfering with the city.
So instead of placing the skyline in the middle, we'll keep most of the buildings in the lower third and reserve the upper area for the effect.
| Reference Image Prompt | Output |
|---|---|
| 16:9 horizontal epic science-fiction film scene. A realistic modern city skyline at dusk, with detailed skyscrapers stretching into the distance beneath thick blue-gray clouds. A small, incomplete arc of blue energy appears high above the center of the city, not yet forming a complete portal. The surrounding sky remains calm, with no large portal structure visible. Position the city buildings primarily within the lower third of the composition, leaving the upper two-thirds for the upcoming visual effect. Wide cinematic framing, realistic architectural details, dramatic sense of scale, subtle natural dusk lighting, clearly defined building silhouettes, no text, no logo, no watermark. | 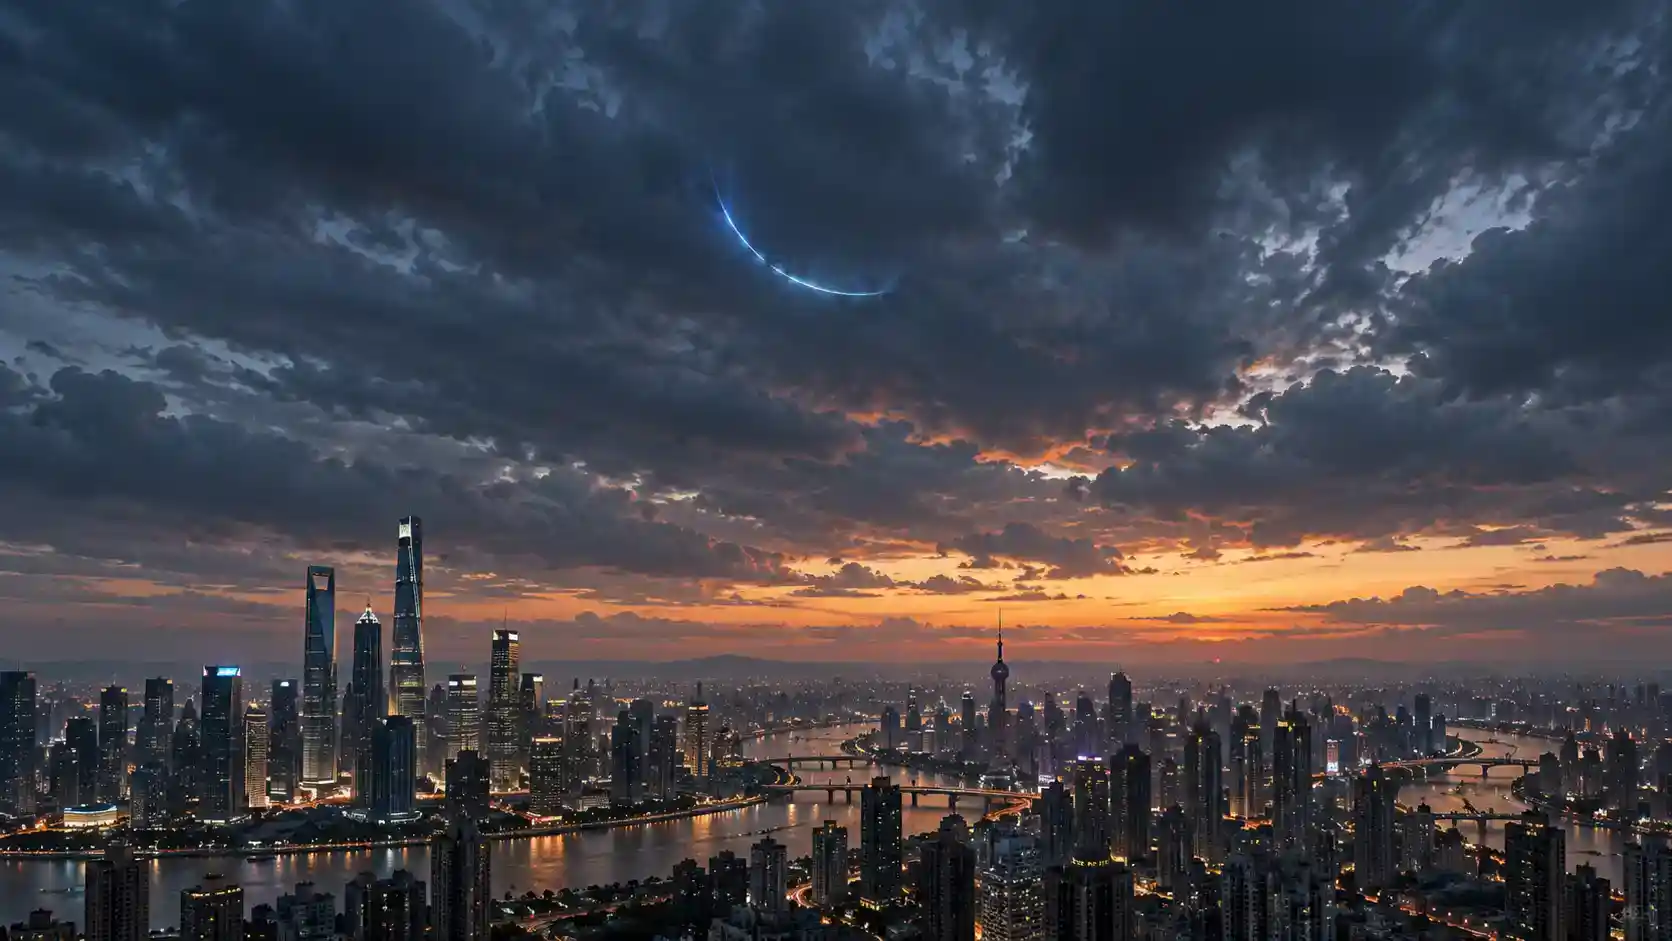 |
Video Prompt:
6-second epic sci-fi cinematic shot. The small blue energy arc above the city gradually expands outward, forming an enormous circular portal. Flowing blue-white energy patterns appear along its outer edge, while the center slowly reveals deep atmospheric light and dimensional depth. Nearby clouds become softly illuminated by the blue energy. The camera slowly pushes forward, emphasizing the immense scale of the portal compared with the city below. Preserve the original buildings, roads, skyline, and ground environment. Keep all visual effects concentrated in the sky. Buildings remain structurally unchanged and do not float, shift, or deform.
What it does: Turns a realistic city image into a large-scale science-fiction scene, showing a portal forming gradually above the skyline.
Best for: Sci-Fi Films, VFX, AI Movie Trailers, Visual Storytelling.
Watch out: The amount of available sky matters. If the city occupies too much of the first frame, the expanding portal may overlap the buildings or become visually crowded.
It's also better to keep the effect concentrated in the sky rather than asking the buildings and ground environment to transform simultaneously.
Key takeaway: Design your first-frame composition around the space your upcoming visual effect will need.
4. Example 3: Awaken an Ancient Stone Guardian
First-frame technique: Create a powerful scene using controlled local movement.
Our third example takes us to a misty mountain valley.
An enormous ancient stone guardian stands motionless between towering cliffs. Its surface is covered in mysterious carved runes.
We want the guardian to awaken.
The obvious approach might be to make it stand up, turn its head, and move its massive arms.
But that also requires the video model to handle complex body movement, heavy stone structures, and environmental interactions simultaneously.
For a short cinematic shot, we don't necessarily need all of that.
Instead, we'll keep the guardian motionless and focus on glowing eyes, illuminated runes, falling stone particles, and drifting mist.
| Reference Image Prompt | Output |
|---|---|
| 16:9 horizontal epic ancient fantasy film scene. An enormous ancient stone guardian statue stands motionless in a mist-covered mountain valley. The statue has a complete, clearly defined head, two arms, and upper body, with intricate ancient runes carved across its stone surface. Its eyes are dark, and all carved runes remain unlit. Surrounding the guardian are steep rocky cliffs, scattered green vegetation, and thin layers of drifting mist. Use a low-angle wide cinematic composition to emphasize the guardian's immense scale. Keep its face and chest runes clearly visible. Realistic stone textures, epic fantasy atmosphere, soft natural lighting, no text, no logo, no watermark. | 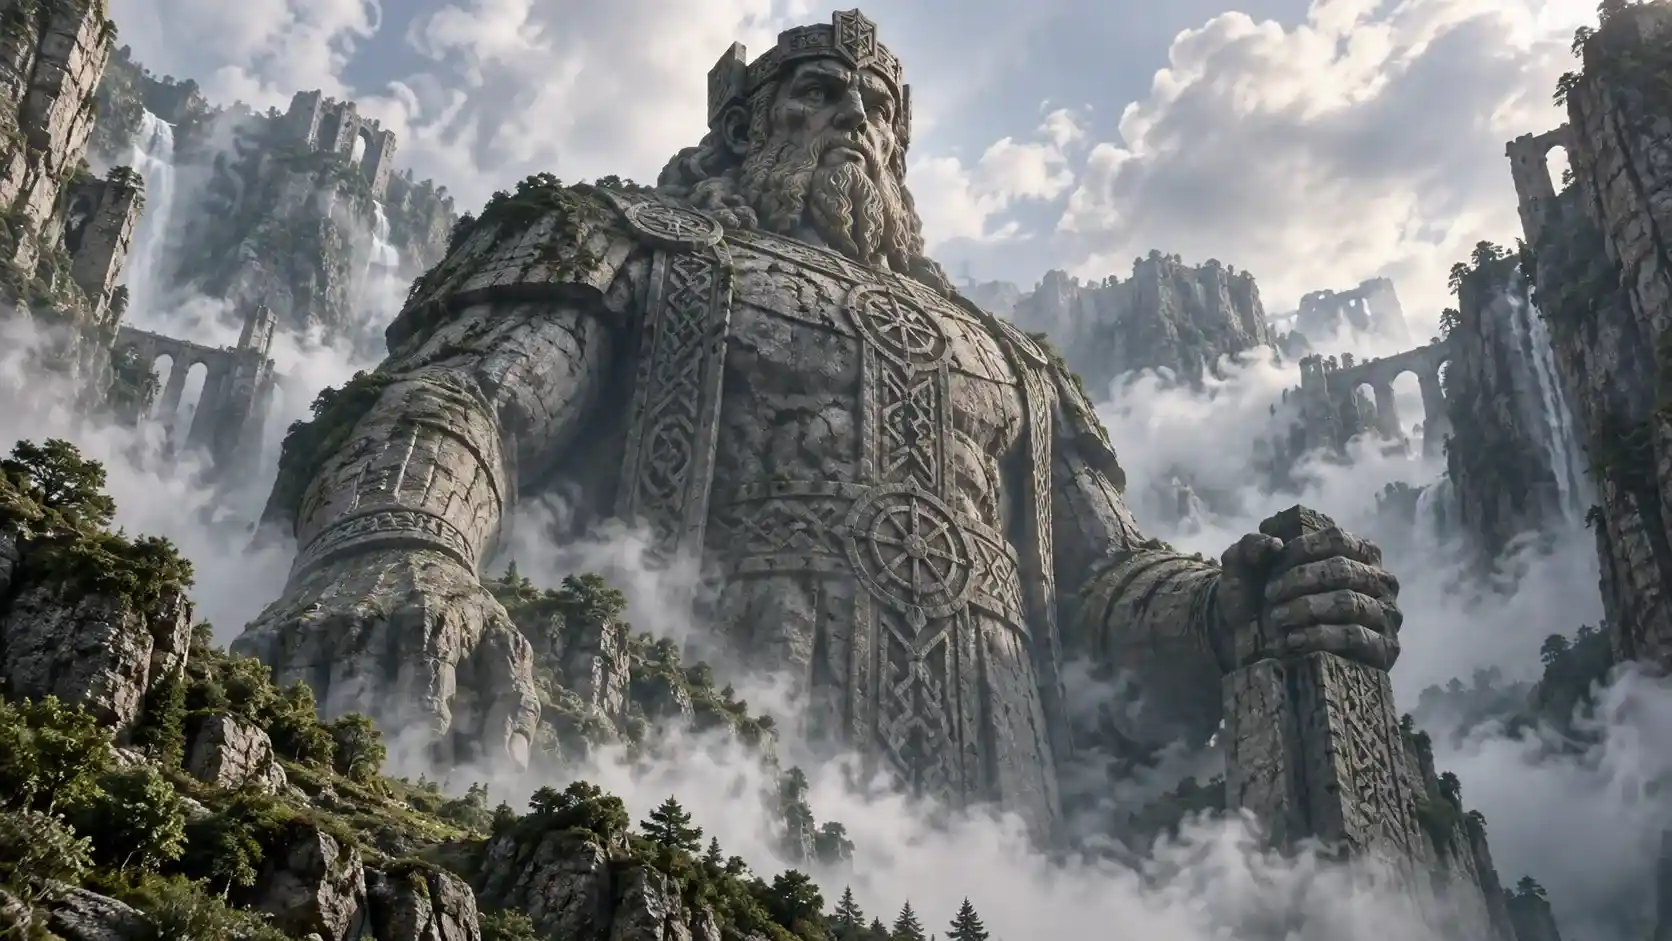 |
Video Prompt:
6-second epic fantasy cinematic shot. The ancient stone guardian remains motionless as its eyes slowly begin to glow with golden light. Golden energy then gradually spreads along the carved runes across its head and chest. A few tiny stone fragments naturally fall from its surface while thin mist drifts through the surrounding valley. The golden illumination softly lights the guardian's face and nearby rock walls. The camera slowly pushes forward, emphasizing its enormous scale and mysterious awakening. Preserve the original statue structure, arm positions, mountain terrain, and carved rune patterns. The guardian does not stand up, walk, or perform additional body movements.
What it does: Creates the impression of an ancient guardian awakening through localized light effects, subtle environmental movement, and controlled camera motion.
Best for: Fantasy Movies, VFX, Concept Films, Game Trailers.
Watch out: You don't need to animate the entire statue to communicate that it's awakening. Making the eyes and runes glow can establish the moment without introducing complicated body movements.
Key takeaway: A visually spectacular scene doesn't always require complicated animation. Sometimes, a few carefully controlled changes are enough.
5. How to Create These Cinematic Videos With Movmix
Now that we have three cinematic concepts, let's turn them into a practical workflow.
Whether you're creating a solar eclipse, a sci-fi portal, or an ancient stone guardian, the general process remains the same.
Step 1: Generate Your First-Frame Image
Start by creating a reference image using an image-generation model.
At this stage, don't try to include every effect you want to see in the final video.
Instead, answer three questions:
- What is the main subject?
- Where should the visual effect begin?
- How much space will the upcoming movement or effect require?
For example, when creating the portal scene, you only need a modern city and a small energy arc in the first frame—not the completed portal.
Step 2: Refine the First Frame if Necessary
Sometimes the generated image already looks excellent, but its composition isn't quite right.
Perhaps the skyline sits too high, leaving insufficient room for the portal. Or a character is positioned too close to the edge of the frame.
You don't necessarily need to recreate everything.
You can use Movmix AI Image to Image to refine the existing image while preserving its original visual identity.
For example, here's a simple prompt for adjusting the city composition.
First-Frame Adjustment Prompt:
Use the reference image of the modern city as the foundation. Preserve the original architectural style, building silhouettes, dusk lighting, and overall environment. Adjust the composition to a 16:9 cinematic wide frame by lowering the skyline slightly, allowing the sky to occupy the upper two-thirds of the image. Keep all buildings structurally clear and leave sufficient open sky for a large-scale visual effect. Do not introduce additional major objects.
Sometimes, a small composition adjustment is more useful than generating an entirely new image.
Step 3: Upload Your Image and Choose a Video Model
Once your first frame is ready, upload it to Movmix and select an image-to-video model.
All three examples in this article are designed as 6-second cinematic shots. Available duration settings may vary depending on the selected model.
Next, enter the corresponding Video Prompt.
The key distinction is simple:
The first frame defines how the scene begins. The Video Prompt describes what happens next.
Instead of repeating every visual detail already present in the image, focus your Video Prompt on the action sequence, effect progression, camera movement, and elements that must remain unchanged.
Step 4: Generate and Review Your Video
Once the video is generated, don't judge it only by how impressive the final frame looks.
Check the entire sequence.
| What to Check | Question to Ask |
|---|---|
| Effect Timing | Does the effect develop naturally from the first frame? |
| Subject Appearance | Does the character, building, or statue retain its original appearance? |
| Effect Area | Does the effect stay within its intended region? |
| Camera Movement | Is the camera motion smooth and consistent? |
If something goes wrong, identify whether the problem comes from the first frame or the Video Prompt.
If the composition is wrong, fix the image. If the requested movement is too complicated, simplify the Video Prompt.
Adding more words isn't always the solution.
6. Three Common First-Frame Mistakes in Cinematic AI Videos
The three examples above reveal an important principle:
A complex-looking scene doesn't need equally complex motion.
When preparing a cinematic first frame for AI video, watch out for these common mistakes.
Mistake 1: Showing the Complete Effect in the First Frame
If you want the video to show an effect developing, don't start with the finished result.
| Video Goal | Less Suitable First Frame | Better First Frame |
|---|---|---|
| Solar eclipse forming | Complete golden eclipse corona | Moon beginning to overlap the sun |
| Portal opening | Fully expanded giant portal | Small, incomplete energy arc |
| Stone guardian awakening | Eyes and all runes already glowing | Dark eyes and unlit runes |
This gives the Video Prompt a clearer direction.
Mistake 2: Leaving No Room for the Effect
If a visual effect needs to expand, the composition must give it enough room.
That's why the portal example reserves most of the upper frame for the sky.
Similarly, if you want a character's cloak to move dramatically in the wind, avoid cropping the subject too tightly.
Think about where the movement will happen before generating the first image.
Mistake 3: Making Everything Move at Once
A visually rich image can tempt us to animate every element.
But you don't need moving buildings, swirling clouds, flying objects, dramatic character movement, and rapid camera rotation in the same short clip.
A powerful cinematic shot can rely on just a few elements:
- Changing light
- Drifting mist
- Slow cloud movement
- Subtle camera movement
- One clearly defined visual effect
Choose one primary action first. Add secondary movement only when it supports the scene.
This makes the result easier to evaluate and refine.
7. First-Frame Checklist Before Generating Your Video
Before uploading your reference image, run through this quick checklist.
| Check | What to Confirm |
|---|---|
| Subject | Is the main subject complete and clearly visible? |
| Starting State | Does the image show the scene before the main effect develops? |
| Motion Space | Is there enough room for the upcoming movement or effect? |
| Background | Are there unnecessary objects blocking the subject? |
| Visual Focus | Which element should attract the viewer's attention? |
| Prompt Match | Does the first-frame state match the action described in the Video Prompt? |
Your first frame doesn't need to contain every possible visual detail.
For a short AI video, a clear starting point is often more useful than an overcrowded image.
FAQ: First Frame for AI Video
Does the first frame have to be AI-generated?
No. Existing photographs, product images, illustrations, and other visual assets can also work as first frames. What matters is whether the image provides a suitable starting point for the intended motion.
Why does a beautiful image sometimes produce a disappointing AI video?
A still image only needs to look convincing at one moment. A video needs to handle everything that happens afterward.
If the first frame contains heavy occlusion, insufficient movement space, or an effect that has already reached its final state, the model may have a harder time following your intended action.
Do cinematic AI videos require complicated Video Prompts?
Not necessarily.
Start with one main effect, then add only the environmental changes and camera movement needed to support it.
For example, the stone guardian scene can communicate a dramatic awakening through glowing eyes, illuminated runes, and drifting mist without requiring the entire statue to move.
What's the difference between a first frame and an end frame?
The first frame defines the visual state at the beginning of the video, while an end frame provides a target state for the final moment.
If your selected model supports first-and-last-frame control, you can prepare both images. The available input options depend on the model.
Can I use the same video model for all three examples?
Yes. Using the same image-to-video model is a reasonable way to begin testing the three concepts.
If one type of effect doesn't perform as expected, you can adjust the first frame or Video Prompt before trying a different model.
Changing everything at once makes it harder to understand what improved the result.
Final Thoughts: Cinematic AI Videos Start With the First Frame
Creating an eye-catching AI video isn't just about selecting a model and writing an elaborate Video Prompt.
Your first frame for AI video plays an equally important role.
These three cinematic examples demonstrate three different ways to prepare an image for animation.
The solar eclipse shows why the starting moment matters.
The sci-fi portal demonstrates how composition should leave room for upcoming effects.
And the ancient stone guardian illustrates how controlled local movement can create a spectacular visual result without complicated animation.
In other words, creating a cinematic AI video doesn't always require dramatic character movement or multiple scene changes.
Sometimes, one carefully prepared first frame and a clear Video Prompt are enough to create a memorable shot.
Ready to try it yourself? Open Movmix AI Image to Video, upload your first frame, choose a suitable video model, and turn your cinematic idea into motion.
A great AI video starts before anything moves.
'%3e%3crect%20y='2.1906'%20width='26'%20height='17.4314'%20rx='1.55981'%20fill='white'/%3e%3c/g%3e%3crect%20x='0.311961'%20y='2.50256'%20width='25.3761'%20height='16.8075'%20rx='1.24784'%20stroke='%2322257C'%20stroke-width='0.623922'/%3e%3c/g%3e%3crect%20x='13.078'%20y='15.5656'%20width='10.8016'%20height='2.49569'%20rx='0.623922'%20fill='%2366B3FF'%20stroke='%2322257C'%20stroke-width='0.623922'/%3e%3crect%20x='-0.311961'%20y='0.311961'%20width='10.8016'%20height='2.49569'%20rx='0.623922'%20transform='matrix(-1%200%200%201%2012.61%2015.2536)'%20fill='%2366B3FF'%20stroke='%2322257C'%20stroke-width='0.623922'/%3e%3crect%20x='10.3093'%20y='13.3231'%20width='4.91339'%20height='6.98013'%20rx='2.45669'%20fill='%2322257C'/%3e%3cpath%20d='M18.9174%200.31543C20.5962%200.268025%2022.1261%200.655527%2023.9487%201.55762C24.0483%201.60695%2024.1137%201.71153%2024.1137%201.8291V16.502C24.1137%2016.7236%2023.8763%2016.891%2023.6499%2016.7979C21.803%2016.0377%2020.2158%2015.6963%2018.4975%2015.7705C16.8915%2015.8399%2015.1907%2016.2732%2013.0776%2017.0332V1.6709C15.4678%200.825877%2017.2746%200.36187%2018.9174%200.31543Z'%20fill='white'%20stroke='%2322257C'%20stroke-width='0.623922'/%3e%3cpath%20d='M15.3008%204.57C16.3536%203.94578%2019.2783%203.20503%2021.8909%203.94608'%20stroke='%2366B3FF'%20stroke-width='0.935883'%20stroke-linecap='round'/%3e%3cpath%20d='M15.3008%207.26054C16.3536%206.63631%2019.2783%205.89557%2021.8909%206.63661'%20stroke='%2366B3FF'%20stroke-width='0.935883'%20stroke-linecap='round'/%3e%3cpath%20d='M15.3008%209.95107C16.3536%209.32684%2019.2783%208.5861%2021.8909%209.32714'%20stroke='%2366B3FF'%20stroke-width='0.935883'%20stroke-linecap='round'/%3e%3cpath%20d='M15.3008%2012.6398C16.3536%2012.0156%2019.2783%2011.2749%2021.8909%2012.0159'%20stroke='%2366B3FF'%20stroke-width='0.935883'%20stroke-linecap='round'/%3e%3cpath%20d='M7.08257%200.31543C5.40384%200.268025%203.87393%200.655527%202.05132%201.55762C1.95165%201.60695%201.88628%201.71153%201.88628%201.8291V16.502C1.88628%2016.7236%202.12373%2016.891%202.35014%2016.7979C4.19702%2016.0377%205.78418%2015.6963%207.50249%2015.7705C9.10852%2015.8399%2010.8093%2016.2732%2012.9224%2017.0332V1.6709C10.5322%200.825877%208.72541%200.36187%207.08257%200.31543Z'%20fill='white'%20stroke='%2322257C'%20stroke-width='0.623922'/%3e%3cpath%20d='M10.6992%204.57C9.64638%203.94578%206.72175%203.20503%204.10907%203.94608'%20stroke='%2366B3FF'%20stroke-width='0.935883'%20stroke-linecap='round'/%3e%3cpath%20d='M10.6992%207.26054C9.64638%206.63631%206.72175%205.89557%204.10907%206.63661'%20stroke='%2366B3FF'%20stroke-width='0.935883'%20stroke-linecap='round'/%3e%3cpath%20d='M10.6992%209.95107C9.64638%209.32684%206.72175%208.5861%204.10907%209.32714'%20stroke='%2366B3FF'%20stroke-width='0.935883'%20stroke-linecap='round'/%3e%3cpath%20d='M10.6992%2012.6398C9.64638%2012.0156%206.72175%2011.2749%204.10907%2012.0159'%20stroke='%2366B3FF'%20stroke-width='0.935883'%20stroke-linecap='round'/%3e%3c/g%3e%3cdefs%3e%3cfilter%20x='0'%20y='2.1906'%20width='26'%20height='17.4314'%20filterUnits='userSpaceOnUse'%20color-interpolation-filters='sRGB'%3e%3cfeFlood%20flood-opacity='0'%20result='BackgroundImageFix'/%3e%3cfeBlend%20mode='normal'%20in='SourceGraphic'%20in2='BackgroundImageFix'%20result='shape'/%3e%3cfeColorMatrix%20in='SourceAlpha'%20type='matrix'%20values='0%200%200%200%200%200%200%200%200%200%200%200%200%200%200%200%200%200%20127%200'%20result='hardAlpha'/%3e%3cfeOffset%20dy='-1.24784'/%3e%3cfeComposite%20in2='hardAlpha'%20operator='arithmetic'%20k2='-1'%20k3='1'/%3e%3cfeColorMatrix%20type='matrix'%20values='0%200%200%200%200.572549%200%200%200%200%200.768627%200%200%200%200%200.976471%200%200%200%201%200'/%3e%3cfeBlend%20mode='normal'%20in2='shape'%20result='effect1_innerShadow_0_4'/%3e%3c/filter%3e%3c/defs%3e%3c/svg%3e)