Google has released Nano Banana 2.1, the latest update to its image generation and editing model family.
The new model continues to focus on both image creation and image editing, with improvements in areas such as instruction following, character consistency, multi-reference editing, product consistency, and visual design.
If you're searching for how to use Nano Banana 2.1 for free, one of the easiest ways to get started is through a visual creation platform like Movmix, without setting up an API or writing code.
This tutorial walks through the actual Nano Banana 2.1 workflow on Movmix, from your first text-to-image generation to reference-based editing and character consistency tests.
What Can You Do With Nano Banana 2.1?
Nano Banana 2.1 is more than a basic text-to-image generator.
You can use it for several different workflows:
Text to Image: Create an entirely new image from a written prompt.
Image to Image: Upload an existing image and change the environment, clothing, product setting, composition, or other visual elements.
Reference-Based Editing: Use reference images to help preserve important characters, products, or design elements.
Multi-Turn Editing: Continue refining an existing result instead of starting over every time.
Google's official model materials also highlight tasks such as text-to-image generation, general editing, character consistency, product consistency, and multi-reference editing.
The easiest way to understand those improvements is to test them directly.
Step 1: Open the Movmix Image Generator
If you want to create an image from scratch, open:
If you already have an image and want Nano Banana 2.1 to modify it, use:
These two workflows serve different purposes.
Text to Image = Start from a prompt.
Image to Image = Start from an existing visual reference.
For your first Nano Banana 2.1 test, it is worth trying both. A single text-to-image result does not fully show what the model can do with editing and visual consistency.
Step 2: Select Nano Banana 2.1
Once you enter the generation page, open the Model selector and choose:
Nano Banana 2.1
Then select the workflow that matches your task.
If this is your first test, start with Text to Image. It is the easiest way to see how well the model understands a complete prompt.
Step 3: Generate Your First Image
You do not need a 500-word prompt.
A practical image prompt usually needs six things:
Subject + Environment + Action + Composition + Lighting + Style
For example:
Image Prompt
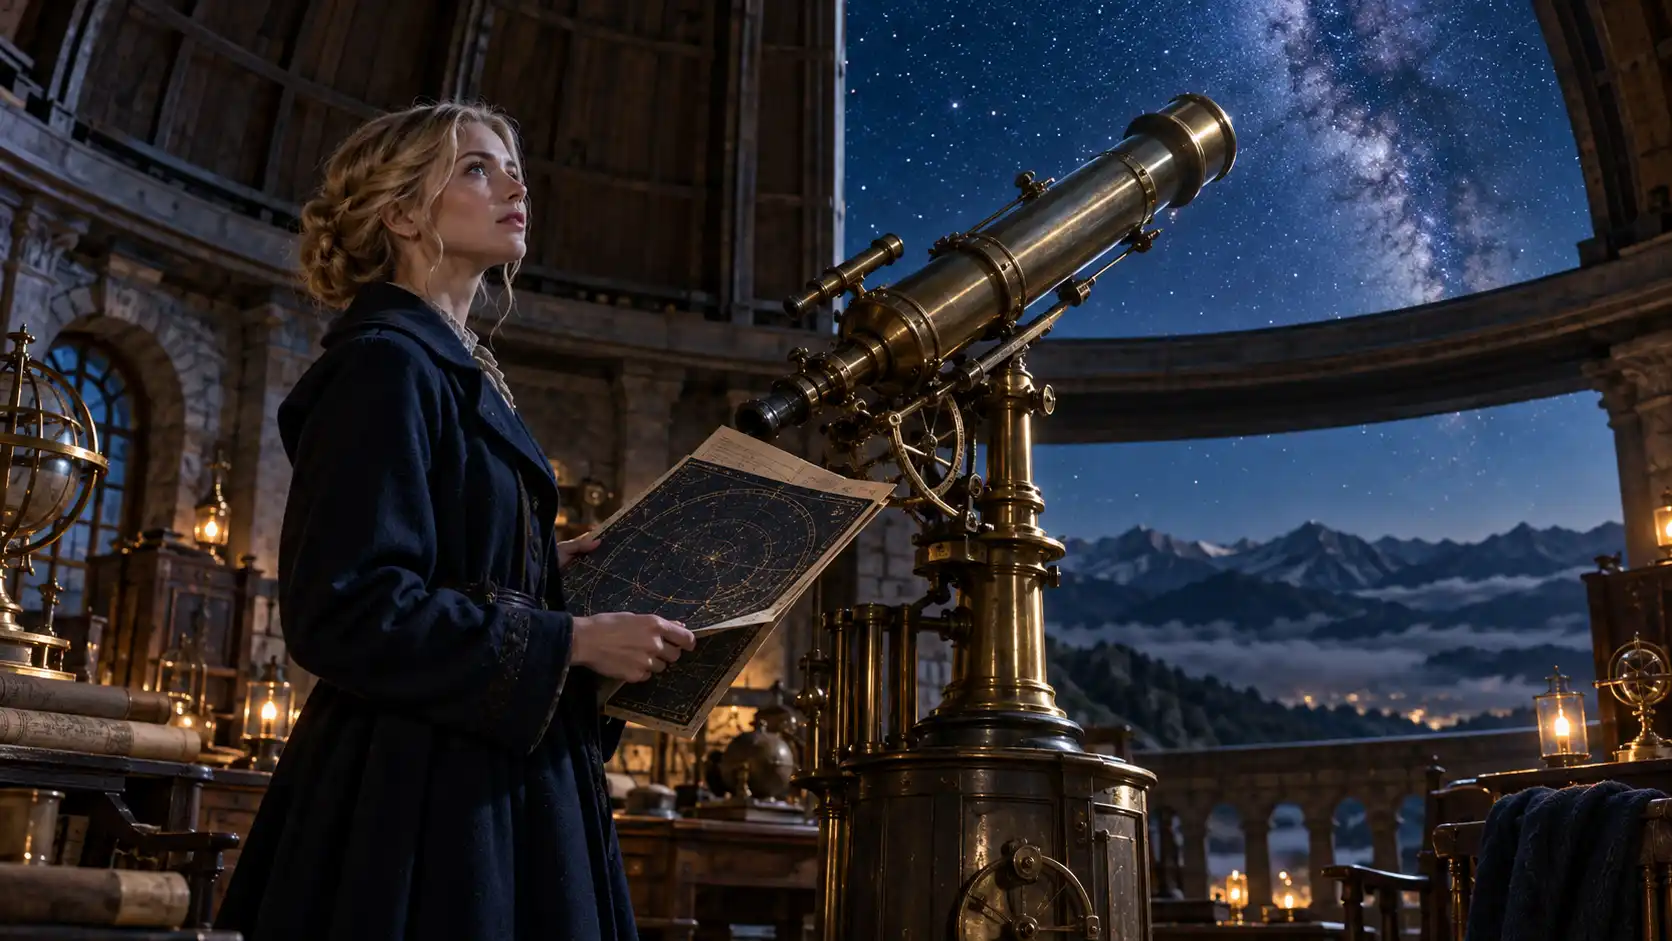
16:9 horizontal image. A blonde European woman stands inside an old mountain observatory, wearing a dark blue long coat and holding an open antique star chart.
The enormous circular observatory dome is partially open, revealing a deep blue night sky and the Milky Way. A large antique brass telescope stands behind her. Moonlight enters through the opening in the dome and creates soft natural highlights along the side of her face and the brass telescope.
Realistic cinematic photography, 50mm lens, medium shot, natural facial details, detailed brass, wood, and stone textures, natural contrast between the deep blue night sky and warm brass surfaces, no text, no logo, no watermark.
Click Generate and review the result.
What Should You Check?
Do not only ask whether the image looks attractive.
Look at whether:
- the character matches the description;
- the observatory, telescope, and star chart all appear;
- the composition follows the prompt;
- hands and complex objects look natural;
- the lighting direction makes sense.
This is a much better way to test Nano Banana 2.1 prompt following.
Step 4: Test Nano Banana 2.1 Image Editing
The next test is more interesting because it measures how well the model can change one part of an image while preserving another.
Open Movmix AI Image to Image, select Nano Banana 2.1, and upload a reference image.
For example, first create a simple product shot.
| Reference Image Prompt | Output |
|---|---|
| 16:9 horizontal premium product photography. A vintage silver-and-black mechanical camera sits in the center of a clean light gray studio surface, facing the camera. Clearly show the body, lens, top dials, buttons, and mechanical structure. Soft studio lighting, realistic metal textures and glass lens reflections, minimal clean background, complete product visible, no text, no logo, no watermark. | 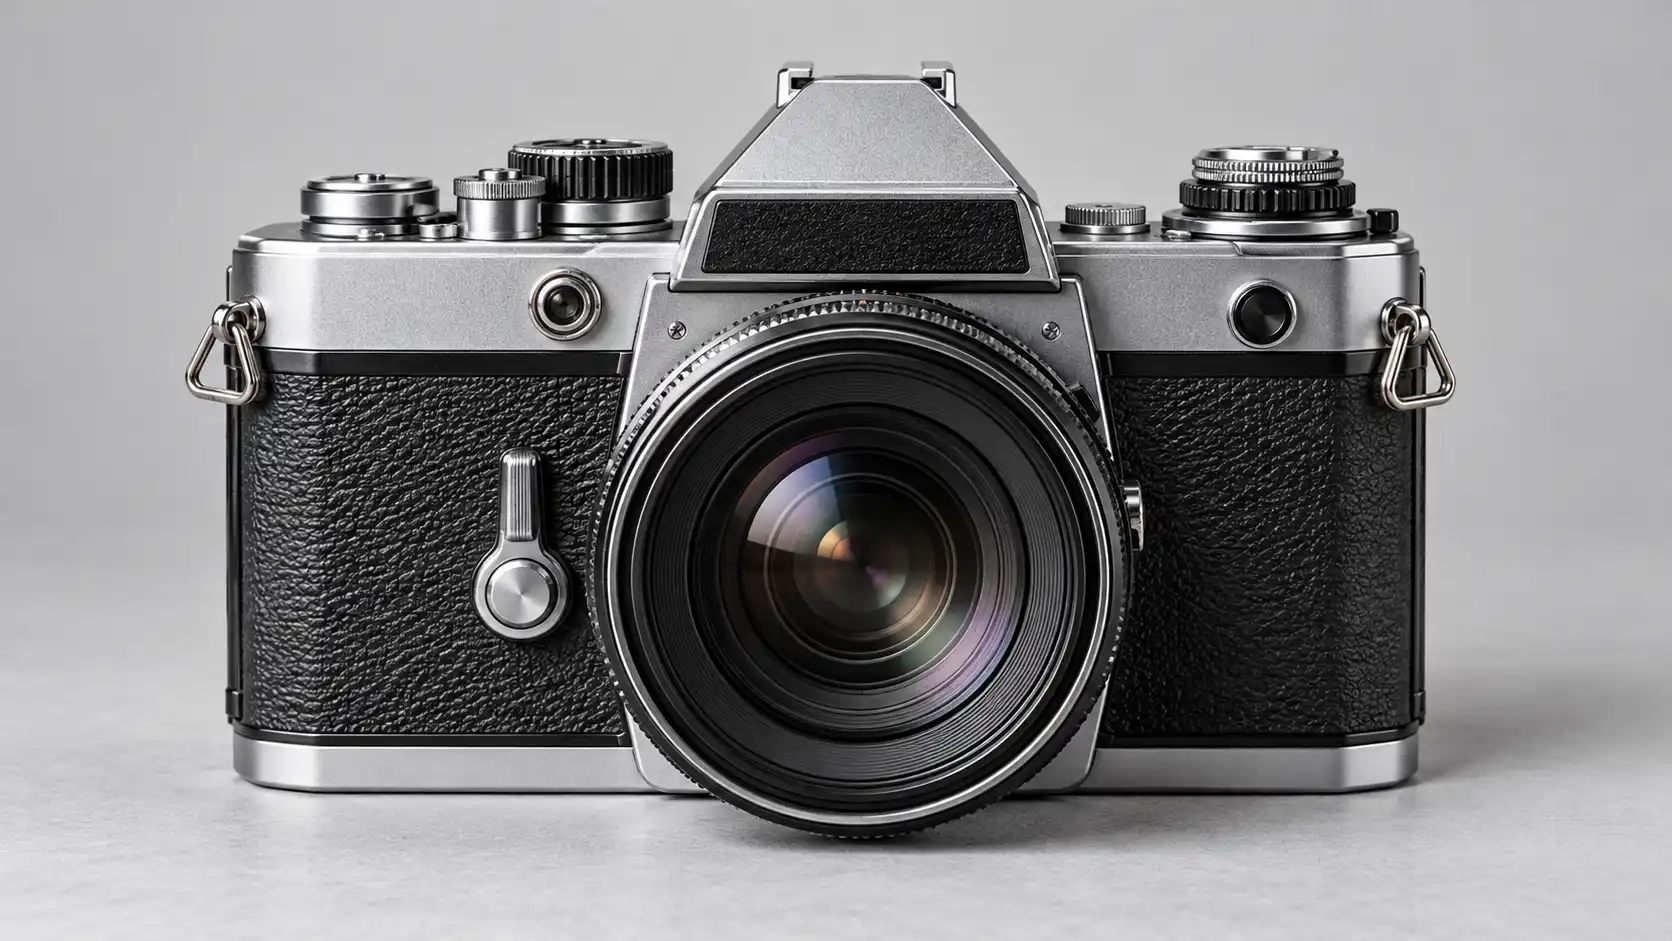 |
Upload that image into Nano Banana 2.1 and use this editing prompt:
| Editing Prompt | Output |
|---|---|
| Keep the vintage silver-and-black mechanical camera unchanged, including its body proportions, lens size, top buttons, dial positions, metal colors, and overall structure. Only change the surrounding environment. Replace the light gray studio background with a warm vintage private study. Place the camera naturally on a dark walnut desk, with softly blurred old bookshelves, a warm table lamp, and a small number of books in the background. Regenerate realistic contact shadows and natural reflections based on the new environment so the camera feels physically integrated into the scene. Do not redesign the camera, add extra lenses or buttons, change its proportions, or generate any text. | 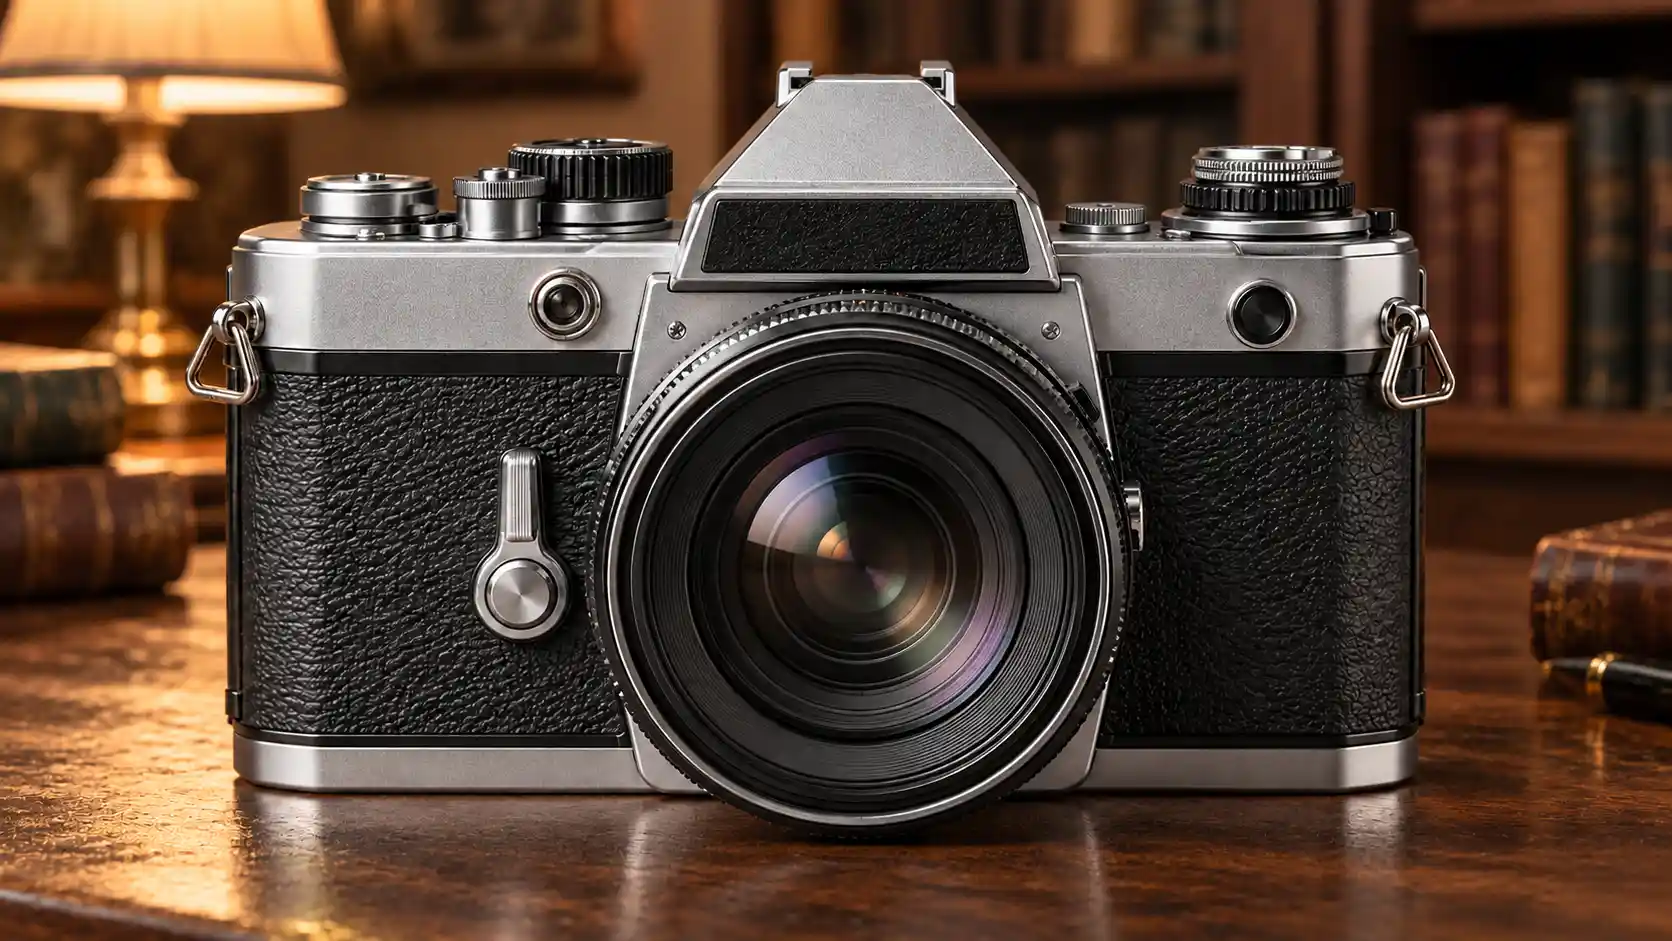 |
This test is not asking whether Nano Banana 2.1 can draw a camera.
It is asking something more useful:
Can it change the environment while preserving the original product?
That makes this type of edit particularly useful for testing product consistency and reference-based editing.
What it does: Changes the surrounding environment while attempting to preserve the original product.
Best for: Product photography, ecommerce visuals, advertising concepts, and background replacement.
Watch out: Zoom in and compare small details such as lens proportions, buttons, and top dials.
A simple before-and-after comparison works best here:
Step 5: Keep Editing Instead of Starting Over
One of the most practical ways to use Nano Banana 2.1 is through multi-turn editing.
Imagine that the study image from the previous step is almost perfect, but the background is too bright.
You do not need to rewrite the entire prompt.
Simply continue with:
Keep the camera, desk, bookshelves, and overall composition unchanged.
Only reduce the brightness of the bookshelf area in the background and make the warm table lamp the main background light source. Keep the exposure and metal details of the camera unchanged.
If the next result still needs more depth, continue again:
Keep all existing content unchanged. Only increase the background depth of field so the bookshelves become more naturally blurred while the camera remains sharp and detailed.
This workflow is often more controllable than generating a completely new image every time.
If something is already correct, do not redesign it. Only describe what needs to change.
Step 6: Test Character Consistency
Another useful Nano Banana 2.1 test is character consistency.
Start with one character reference and move the same person into different environments.
For example:
First Edit
Keep the character's facial features, medium-length blonde hair, dark green long coat, beige knit top, and overall appearance consistent with the reference image.
Place the same character on an old London street after the rain, standing outside a vintage bookstore. She holds a dark umbrella in one hand and an old book in the other.
Wet pavement naturally reflects warm street lighting, with softly blurred historic buildings in the distance and realistic overcast evening light.
Keep the same identity, hairstyle, and clothing.
Then continue into a second setting.
Second Edit
Continue using the same character with the same face, hairstyle, dark green coat, beige top, and the same old book.
Move the scene inside the bookstore. The character now stands between tall wooden bookshelves and looks down while reading the same book.
Use soft warm table-lamp lighting and a quiet, realistic old-bookstore atmosphere. Keep the character appearance and clothing consistent with the previous image.
Now compare the two images.
The most important question is not whether the bookstore looks beautiful.
It is:
Does the person still look like the same character after the environment changes?
That is where character consistency becomes much more valuable than simply generating another attractive portrait.
Which Movmix Workflow Should You Use?
| Your Goal | Recommended Workflow |
|---|---|
| Create a completely new image | AI Text to Image |
| Edit an existing photo | AI Image to Image |
| Replace a background | AI Image to Image |
| Keep a character while changing scenes | AI Image to Image |
| Place a product into a new environment | AI Image to Image |
| Create a poster or visual concept from text | AI Text to Image |
If you are unsure which one to choose, remember this:
No reference image? Start with Text to Image.
Already have something you want to preserve? Use Image to Image.
How to Get Better Nano Banana 2.1 Results
If the first result is not right, avoid immediately making the prompt longer.
First identify the actual problem.
If the character looks wrong, clarify the important character features.
If the composition is wrong, describe the subject position and camera distance more precisely.
If an image edit changes too much, clearly write:
“Only change…”
and:
“Keep … unchanged.”
For multi-turn editing, avoid repeatedly modifying areas that are already correct.
Small, targeted instructions are often more effective than rewriting the whole prompt.
Start Using Nano Banana 2.1 on Movmix
The most interesting part of Nano Banana 2.1 is not simply generating another beautiful AI image.
Its real value appears when image generation, reference-based editing, character consistency, product preservation, and multi-turn refinement become part of the same workflow.
For your first test, try these four steps:
Text to Image → Image to Image → Multi-Turn Editing → Character Consistency
That will give you a much clearer idea of what Nano Banana 2.1 can actually do than generating ten unrelated images.
'%3e%3crect%20y='2.1906'%20width='26'%20height='17.4314'%20rx='1.55981'%20fill='white'/%3e%3c/g%3e%3crect%20x='0.311961'%20y='2.50256'%20width='25.3761'%20height='16.8075'%20rx='1.24784'%20stroke='%2322257C'%20stroke-width='0.623922'/%3e%3c/g%3e%3crect%20x='13.078'%20y='15.5656'%20width='10.8016'%20height='2.49569'%20rx='0.623922'%20fill='%2366B3FF'%20stroke='%2322257C'%20stroke-width='0.623922'/%3e%3crect%20x='-0.311961'%20y='0.311961'%20width='10.8016'%20height='2.49569'%20rx='0.623922'%20transform='matrix(-1%200%200%201%2012.61%2015.2536)'%20fill='%2366B3FF'%20stroke='%2322257C'%20stroke-width='0.623922'/%3e%3crect%20x='10.3093'%20y='13.3231'%20width='4.91339'%20height='6.98013'%20rx='2.45669'%20fill='%2322257C'/%3e%3cpath%20d='M18.9174%200.31543C20.5962%200.268025%2022.1261%200.655527%2023.9487%201.55762C24.0483%201.60695%2024.1137%201.71153%2024.1137%201.8291V16.502C24.1137%2016.7236%2023.8763%2016.891%2023.6499%2016.7979C21.803%2016.0377%2020.2158%2015.6963%2018.4975%2015.7705C16.8915%2015.8399%2015.1907%2016.2732%2013.0776%2017.0332V1.6709C15.4678%200.825877%2017.2746%200.36187%2018.9174%200.31543Z'%20fill='white'%20stroke='%2322257C'%20stroke-width='0.623922'/%3e%3cpath%20d='M15.3008%204.57C16.3536%203.94578%2019.2783%203.20503%2021.8909%203.94608'%20stroke='%2366B3FF'%20stroke-width='0.935883'%20stroke-linecap='round'/%3e%3cpath%20d='M15.3008%207.26054C16.3536%206.63631%2019.2783%205.89557%2021.8909%206.63661'%20stroke='%2366B3FF'%20stroke-width='0.935883'%20stroke-linecap='round'/%3e%3cpath%20d='M15.3008%209.95107C16.3536%209.32684%2019.2783%208.5861%2021.8909%209.32714'%20stroke='%2366B3FF'%20stroke-width='0.935883'%20stroke-linecap='round'/%3e%3cpath%20d='M15.3008%2012.6398C16.3536%2012.0156%2019.2783%2011.2749%2021.8909%2012.0159'%20stroke='%2366B3FF'%20stroke-width='0.935883'%20stroke-linecap='round'/%3e%3cpath%20d='M7.08257%200.31543C5.40384%200.268025%203.87393%200.655527%202.05132%201.55762C1.95165%201.60695%201.88628%201.71153%201.88628%201.8291V16.502C1.88628%2016.7236%202.12373%2016.891%202.35014%2016.7979C4.19702%2016.0377%205.78418%2015.6963%207.50249%2015.7705C9.10852%2015.8399%2010.8093%2016.2732%2012.9224%2017.0332V1.6709C10.5322%200.825877%208.72541%200.36187%207.08257%200.31543Z'%20fill='white'%20stroke='%2322257C'%20stroke-width='0.623922'/%3e%3cpath%20d='M10.6992%204.57C9.64638%203.94578%206.72175%203.20503%204.10907%203.94608'%20stroke='%2366B3FF'%20stroke-width='0.935883'%20stroke-linecap='round'/%3e%3cpath%20d='M10.6992%207.26054C9.64638%206.63631%206.72175%205.89557%204.10907%206.63661'%20stroke='%2366B3FF'%20stroke-width='0.935883'%20stroke-linecap='round'/%3e%3cpath%20d='M10.6992%209.95107C9.64638%209.32684%206.72175%208.5861%204.10907%209.32714'%20stroke='%2366B3FF'%20stroke-width='0.935883'%20stroke-linecap='round'/%3e%3cpath%20d='M10.6992%2012.6398C9.64638%2012.0156%206.72175%2011.2749%204.10907%2012.0159'%20stroke='%2366B3FF'%20stroke-width='0.935883'%20stroke-linecap='round'/%3e%3c/g%3e%3cdefs%3e%3cfilter%20x='0'%20y='2.1906'%20width='26'%20height='17.4314'%20filterUnits='userSpaceOnUse'%20color-interpolation-filters='sRGB'%3e%3cfeFlood%20flood-opacity='0'%20result='BackgroundImageFix'/%3e%3cfeBlend%20mode='normal'%20in='SourceGraphic'%20in2='BackgroundImageFix'%20result='shape'/%3e%3cfeColorMatrix%20in='SourceAlpha'%20type='matrix'%20values='0%200%200%200%200%200%200%200%200%200%200%200%200%200%200%200%200%200%20127%200'%20result='hardAlpha'/%3e%3cfeOffset%20dy='-1.24784'/%3e%3cfeComposite%20in2='hardAlpha'%20operator='arithmetic'%20k2='-1'%20k3='1'/%3e%3cfeColorMatrix%20type='matrix'%20values='0%200%200%200%200.572549%200%200%200%200%200.768627%200%200%200%200%200.976471%200%200%200%201%200'/%3e%3cfeBlend%20mode='normal'%20in2='shape'%20result='effect1_innerShadow_0_4'/%3e%3c/filter%3e%3c/defs%3e%3c/svg%3e)